The Non-Coder’s Guide to Getting Started with Google Tag Manager | The InvisiblePPC Simple Answer Series

Using Google Tag Manager makes it easy to track conversions and events on your website. Learn how to install it on your pages today!

If you’d like to learn how to use Google Tag Manager, setting up your account and placing the container code is the first step. For those who don’t know, Google Tag Manager is a wonderful tool that helps non-coders add various tags and tracking to their site with a simple process. It’s a great way to deploy Google Ads conversion codes and third party phone tracking with one snippet of code. You’ve probably heard of it, but you may not know how to get started.

Getting Started – Agency Level

To get started with Google Tag Manager, you’ll need to start an account. Agencies who use our outsourced Google Ads management find it most effective to create one manager account to house a container for each client. Alternatively, you can build an individual account for each client if that’s what your client prefers. As an agency, you’ll generally want to make a manager account and then a sub-container for each client. This can be done by going to the Google Tag Manager sign up.

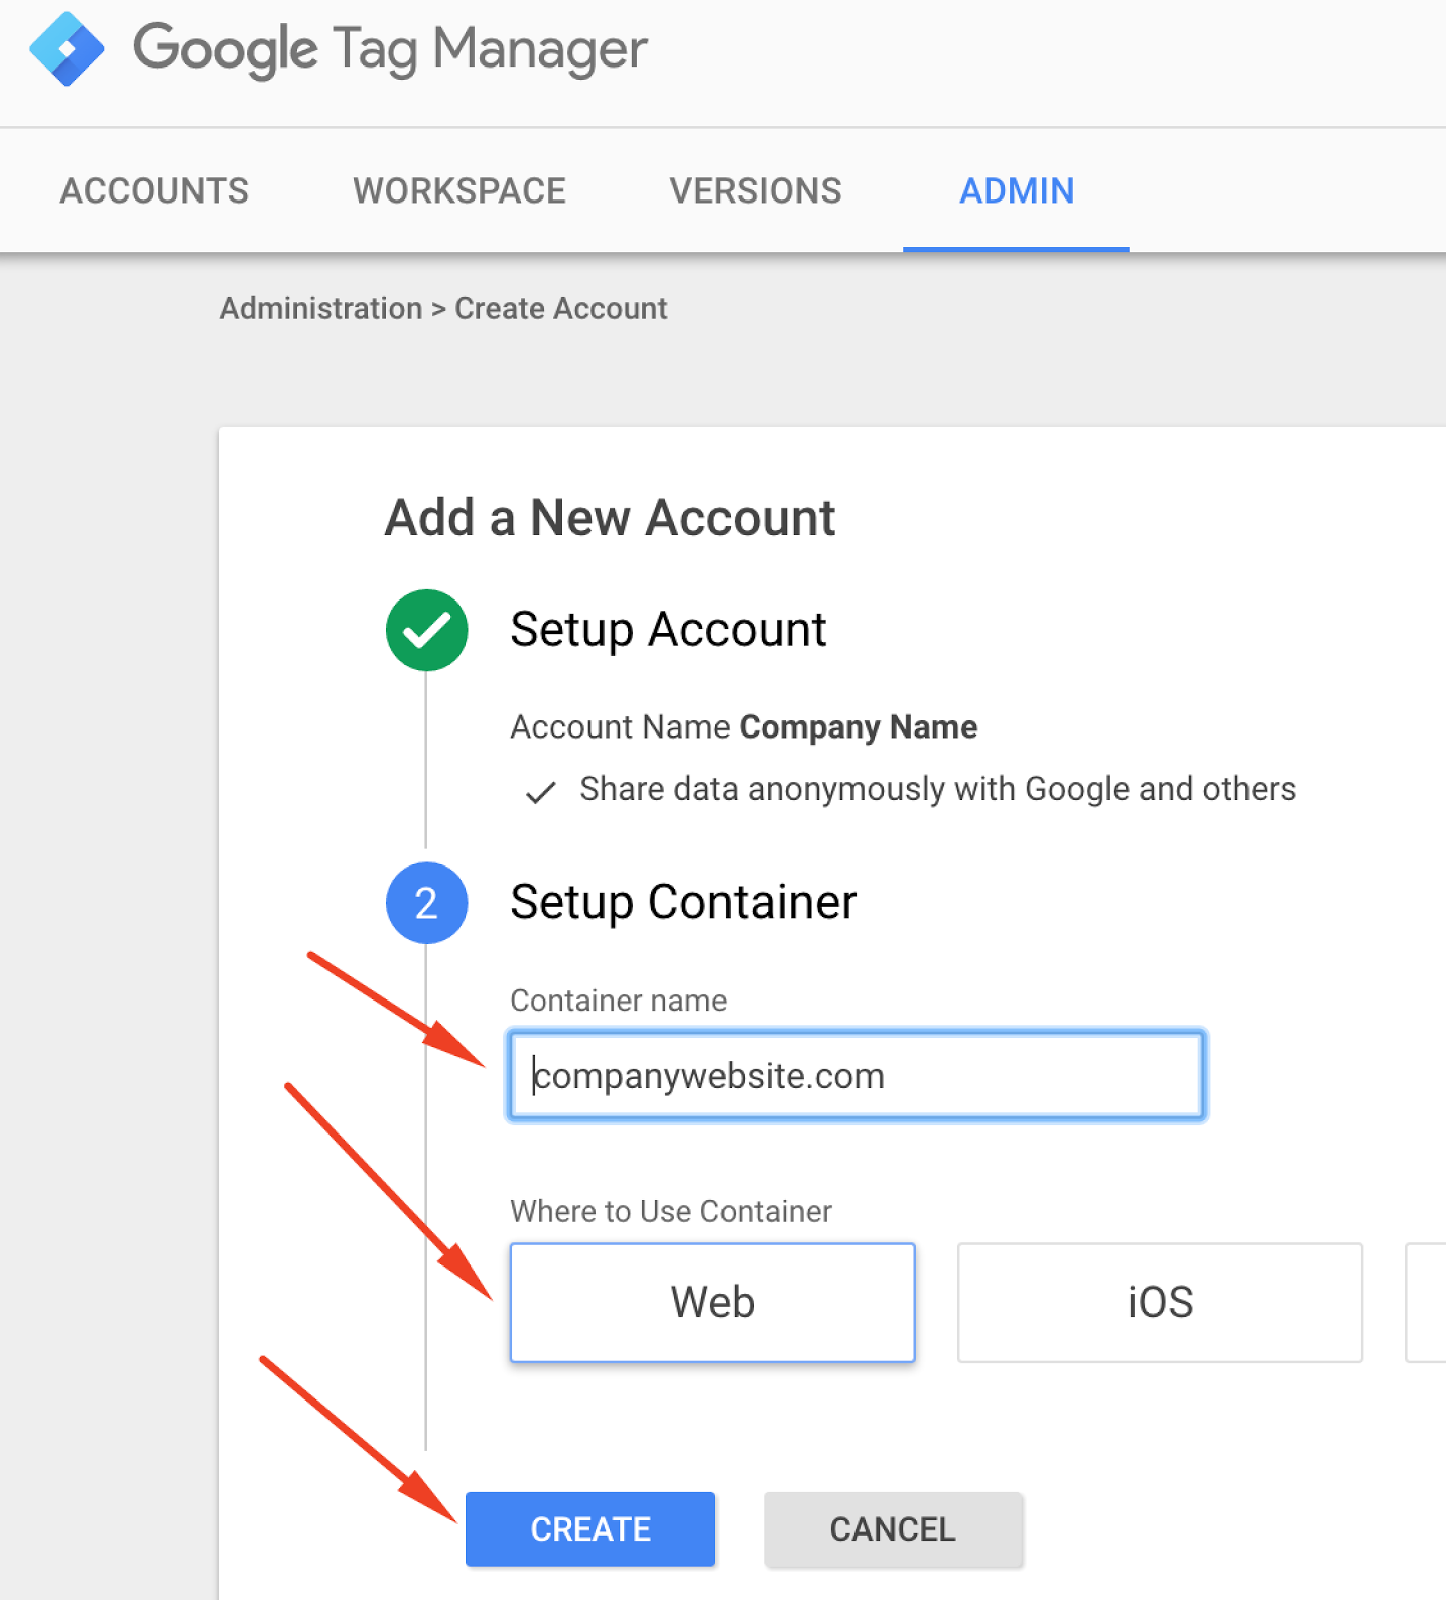
When you sign up a new client, start by creating an account for your agency. You’ll do this by going to the Google Tag Manager sign up page listed above. Click the green “Sign Up For Free” button in the right hand corner of the page, and then follow the steps to start an account. This process starts with naming your account. It’s best to make this your agency name as naming conventions will help you stay organized. Next, click continue.

Setting Up the Container

We’ll begin with setting up the container. This will allow you to generate a code to place on the website. In company name, you’ll want to place the website’s URL without the “www.” Click the “web” button under “where to use container.” Now, you’ll want to click the “create” button.
This will bring you to the terms of service page where you’ll want to click “yes.”

Placing the Container on Your Site

Clicking “yes” to the terms of service will bring you to the implementation code and instructions for Google Tag Manager. This code is the code you’ll want to install on your website.

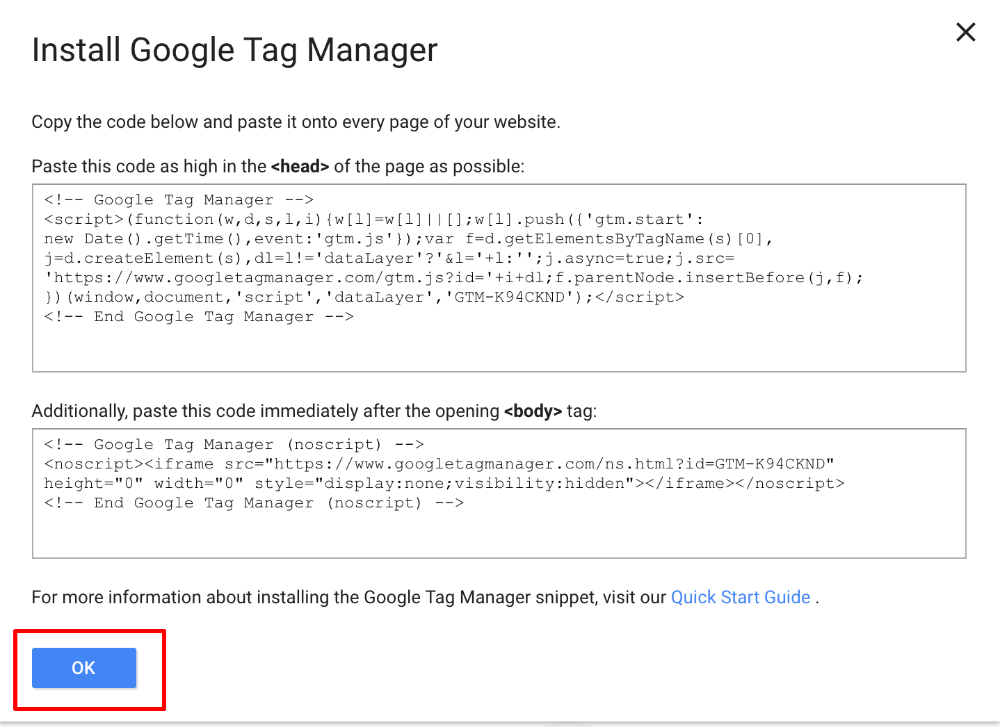
How to Install the Code

First, you’ll need to determine how you interact with the website. Is there a CMS, or a developer that writes the code? Maybe you use a landing page tool instead.

Google Tag Manager Plugins for Popular CMS Platforms

If there is a CMS, please see the resources below to find the right plugin.

WordPress: GTM4WP

Magento: Google Tag Manager

Wix: Not currently supported

Drupal: Google Tag

Landing Page Tools

Some agencies use landing page tools rather than a CMS or a website. These are tools like ClickFunnels and Unbounce. If you’re an Unbounce user, then place the Google Tag Manager container with the helpful video tutorial below.

Putting the Code on Your Website

If you don’t have a CMS and you aren’t using a landing page tool, then you’ll need to place the code directly on your website. To do this, you’ll open up your website’s code and paste the code (generated in the previous step). You will take the code in the first box and put it after the first <head> tag and before the </head> in your code. Then, you’ll take the code from the second box and put it into the code directly after the <body> tag.

Please remember it will need to be on every single page of your website.

Watch the video below to see how to install the Google Tag Manager code.

Creating Containers for Your Clients

Once you’ve opened an account for your agency, or if you’re working with an existing account (your own or a client’s), you can set up other Google Tag Manager subaccounts for clients. You do this by logging into your Tag Manager account, and then clicking on the three dots on the right hand side.
From here, you’ll follow the same steps you took when you produced a new account. This includes the creating the account, entering the domain, and generating the code snippet as well as placing the unique code snippet for the newly built account on the client website. Every account should have a domain of its own and every account will have it’s own code snippet, so be sure to utilize the correct one on each site.

Granting Access

You’ve created an agency level Google Tag Manager account and containers for your clients, but your work may not yet be finished. If you work with other providers, such as InvisiblePPC, they will need access to generate various tags.

To grant access to someone, you’ll need a Gmail address to give the access to. Then, you’ll click the accounts tab and find the account you’d like to grant access to. Click the three dots and then “User Management.”

Now, added a new user but clicking the “New” button.

In the “New User” information add the email and choose the “Admin Permissions” and “Container Permissions.” Options for “Admin Permissions” are Manage Account UsersPermissions, and Settings. Choices for “Container Permissions” are View Edit, and Publish. Once you’ve updated these settings, click the “Add” button.

Resources:

Leave a Comment

Leave a Comment

Justin Rondeau
Justin Rondeau
Justin has been doing this whole “Marketing” thing since 2010, when he was mildly […okay maybe more than mildly] obsessed with all things, data, email, optimization, and split testing. He’s trained thousands of marketers, spoken on hundreds of stages, runs a delightful team of marketers, has dozens of shirts louder than his voice, and loves one hockey team: the Boston Bruins.