You’ve just set up your Google Ads account, or maybe you’ve inherited one that wasn’t tracking properly. Either way, you know you need to track those conversions that are coming in.
Table of Contents
Types of Conversion Actions in Google Ads
Getting Started with Tracking Implementation
Google Ads Conversion Tracking for Call Extensions and Call-Only Ads
Google Ads Conversion Tracking For Phone Calls On A Website
Google Ads Conversion Tracking For Calls From A Mobile Website
Google Ads Conversion Tracking For Apps
Importing Offline Conversions
Types of Conversion Actions in Google Ads.
Website Conversions
Phone Call Conversions
By using phone call conversions in Google Ads, you can tie keywords, ads, campaigns, and other data back to the converting call. This allows you to optimize your account better and track your return on ad spend.
App Conversions
Imported Conversions
Getting Started with Tracking Implementation
Create a Conversion Action
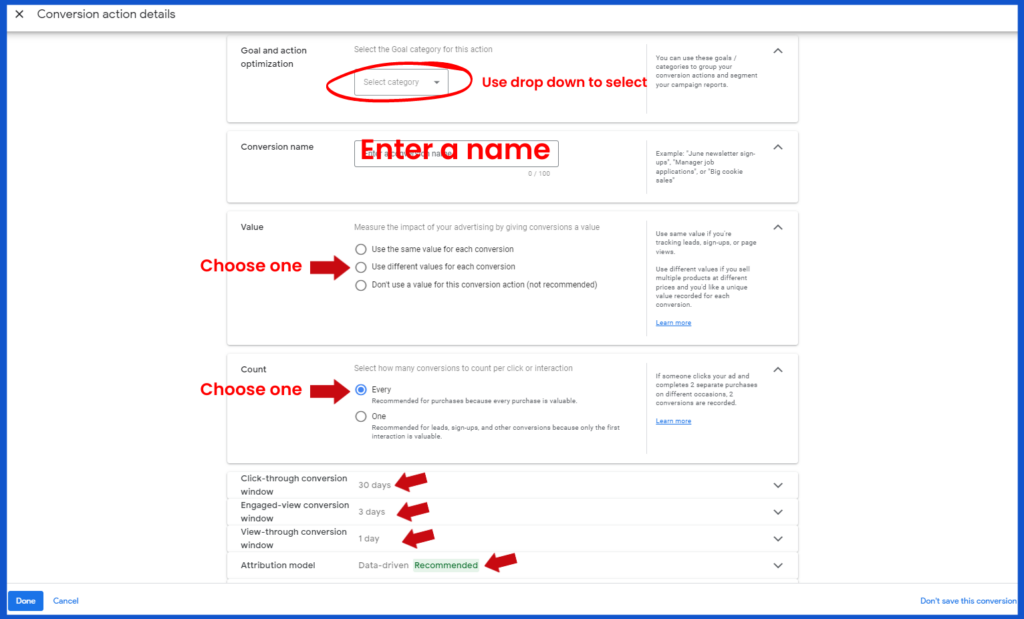
Choose the Category
Add the Conversion Value
- Choose “Don’t assign value” if you don’t know the value or if there isn’t one.
- Choose “Use the same value for each conversion” if you’d like to assign a static value.
- Choose “Use different values for each conversion” if you’re tracking purchases for different products.
Select the Conversion Count
- Selecting “One” tells Google Ads to only count one conversion per ad click. Meaning that if the same user fills out your form multiple times, the conversion will only be counted once. This works well for actions like capturing leads and sign-ups.
- Selecting “Every” tells Google Ads to count a conversion every time a user makes a purchase or completes the conversion action. This setting should be used for sales since you usually see value from each purchase or goal performed.
Set the Conversion Window
Implementing the Conversion Tracking Code
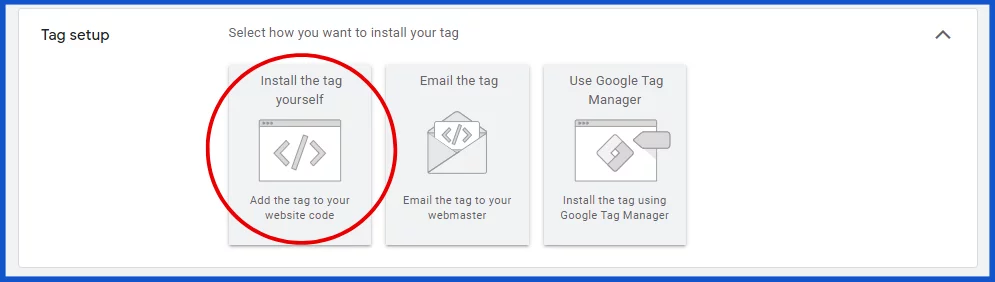
Click the “Install the tag yourself” box in Google Ads.
The first piece of code is called the global site tag. If you’ve installed Google Ads tracking or remarketing on your site before, then you may already have this code installed. It’s best to check before proceeding as you do not want to duplicate this code.
If you’ve never installed the global site tag before, you should select “I haven’t installed the global site tag on my website” as shown in the screenshot below.

If you have installed the global tag from another Google product like Google Analytics, then you don’t need to do so again. You may, however, need to edit this tag to make sure it is properly setup for conversion tracking. To configure the global site tag for conversion tracking you need to add a small line of code that looks like this: gtag(‘config’, ‘AW-CONVERSION_ID’); and includes the conversion ID for your Google Ads account. If this all sounds too technical, then make sure you get a developer to help out!
Once you’ve confirmed that the global site tag has been added to your site, you can move on to the second piece of code, the event snippet.
Under “event snippet,” in the Google Ads conversion setup process, you’ll be asked to make a choice about how your conversion is tracked. “Page load” or “Click.”
If you select “Page load,” Google Ads will trigger the conversion as soon as the page loads. You should use this if you’re going to track when someone arrives on a thank you or confirmation page, which is the most common method.
If you select “Click,” Google Ads will trigger the conversion when an element on the page is clicked. This is useful if you want to track a button or link click. For example, if you have a “buy now” or “submit” button, you would use this.
Once you have selected one of these options, copy the code snippet from the box below.
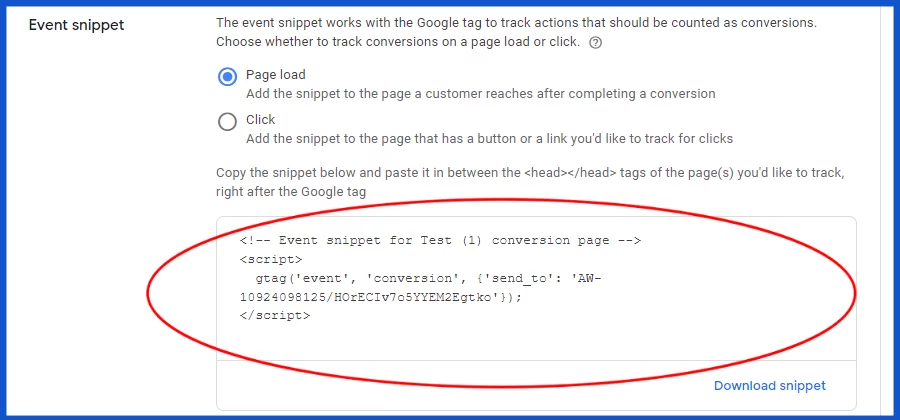
If you’re tracking a page load (usually the thank you or confirmation page), then you’ll need to paste the code on the specific page you want to track between the <head></head> tags.
If you’re tracking a button or link click, you’ll have to add the code to pages where the button or link appears between the <head></head> tags, as well as adding some additional code that is unique to this conversion. See Google’s instructions on how to add this click conversion code.
After implementing the event snippet code you’re all set up for tracking website conversions! It may sound like a lot of work, but it’s actually quite easy once you get started.
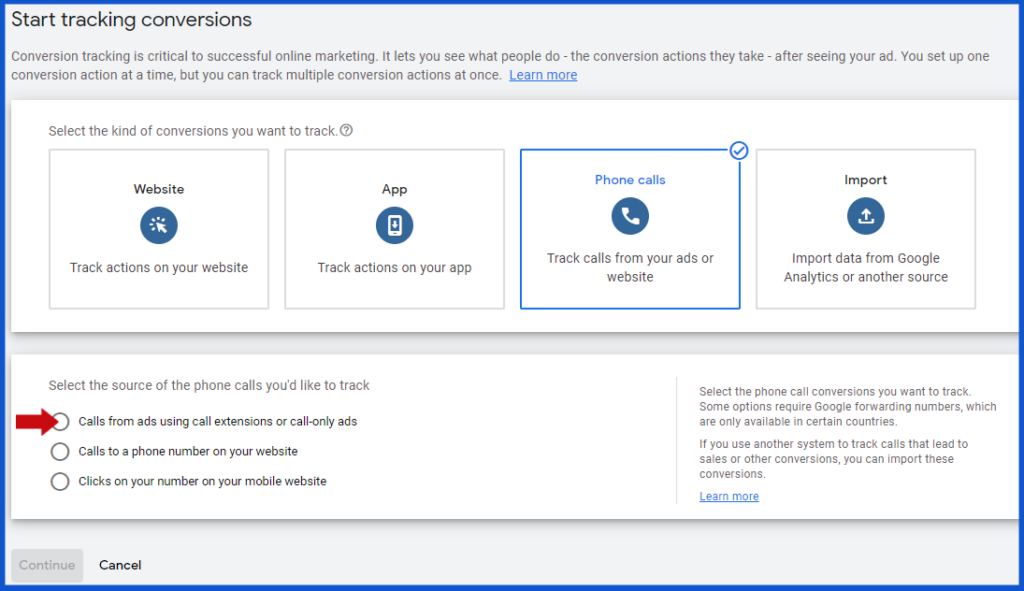
Google Ads Conversion Tracking for Call Extensions and Call-Only Ads
The first way to set up conversion tracking for phone calls is to leverage the “call extension” or “call only ad” options.
Note: Keep in mind that you’ll need to be in a country that’s eligible for this. You must also be using a “call extension” or a “call only ad” to utilize this type of tracking.
Create a Conversion Action
Choose a Conversion Name
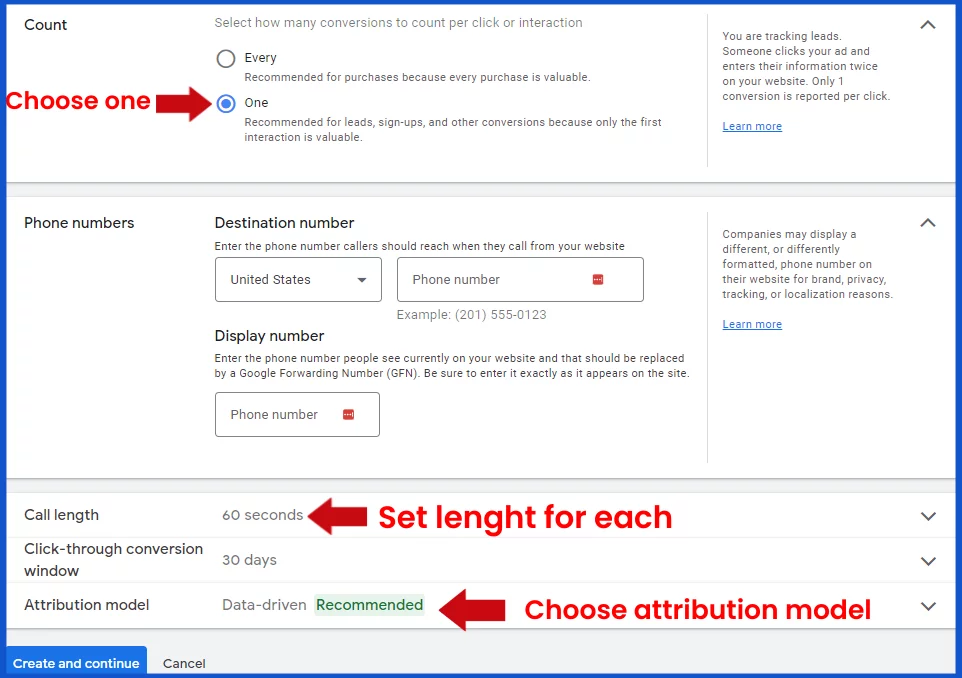
Select a Call Count
The “Count” reflects how you’d like to count these conversions. If you’d like to count every single call as a conversion, then pick “Every.” However, seeing these conversions are phone calls and not purchases, you may want to use “one” which makes sure you don’t count duplicate calls.
“Call Length” is the next setting, where you can set a minimum call length (in seconds) for a call to be considered a conversion. We recommend starting with 30 seconds, which is usually long enough for a call to be answered or a voicemail to be left.
Determine a Call Conversion Window
The “Conversion Window” can be anything from 1 to 60 days. This window depends on your business type. It’s how long Google Ads will track someone who clicks to see if they convert, so it certainly doesn’t hurt to use the full length.
The “Attribution Model” can be a bit tricky. Its purpose is to attribute a sale to a marketing channel. You can attribute sales based on the first click, the last click, or some other combination. Last click attribution is most common in PPC reporting, but that doesn’t mean you have to use it.
Easy! Now you’ve completed the process of creating a phone call conversion; you can click “create” and “continue.”
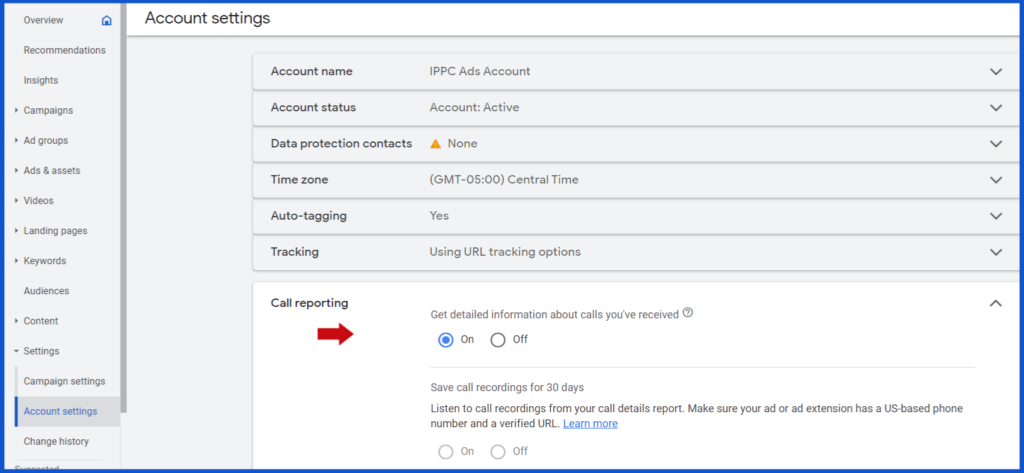
- Simply sign into your Google Ads account, click on “All campaigns,”
- Then navigate to “Settings” and select the “Account settings” tab.
- From there, switch “Call reporting” to “On,” and voila!
And if you want to know more About call assets, then you can refer to this article.
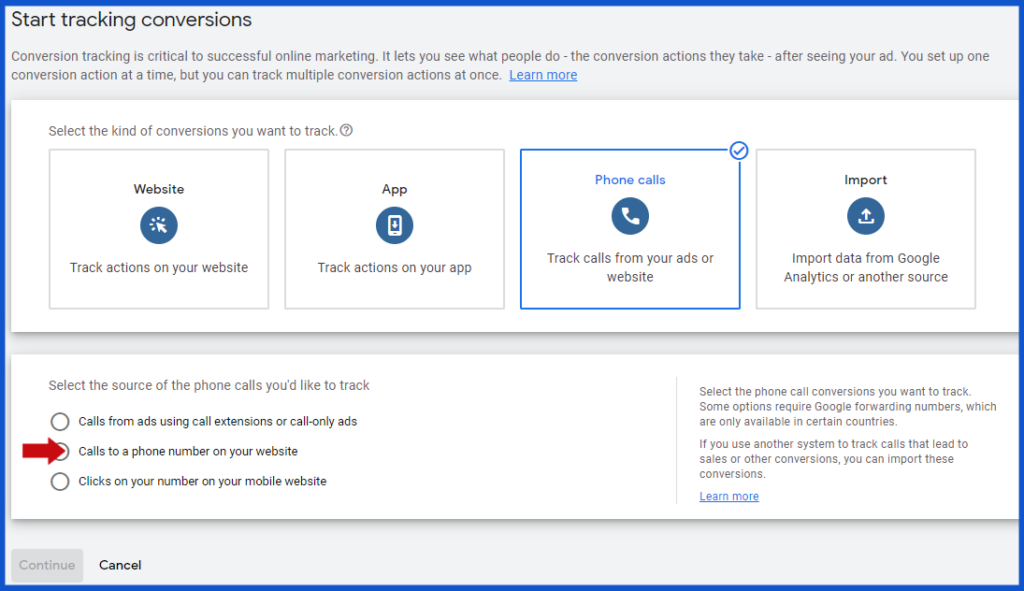
Google Ads Conversion Tracking For Phone Calls On A Website
Create a Conversion Action
Choose a Conversion Name
The next step is to create a “Conversion Name.” Pick something you can easily identify since it’ll be in your reports. Maybe use something like “Calls from www.mysite.com,” so you know where the call came from.
The default setup for this tracking is to “Include Conversions” in the regular conversion column of your reporting. If you are using other call tracking software in addition to this method, uncheck the box for this setting to avoid any double counting that might happen.
Then click “Create and Continue.”
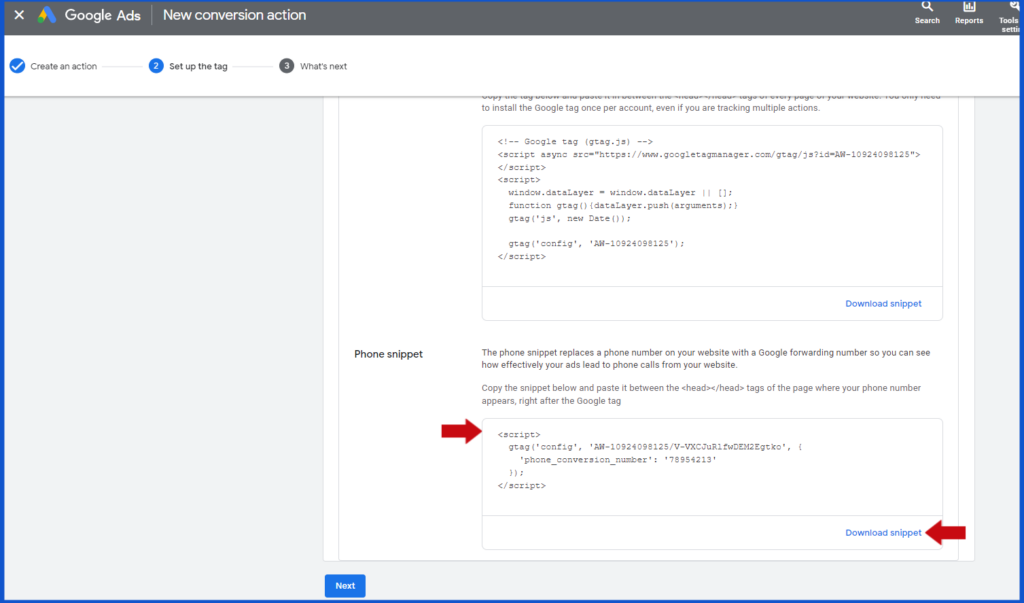
Install the Phone Tracking Code on Your Website
You will need both the global site tag and “phone snippet” added to your website.
For the “phone snippet” code, you will need to add this to the page(s) where the phone number appears on your site. This piece of code replaces the phone number on your website with a Google forwarding number.
Note: In order for this to work correctly, you’ll have to put the code on every page where you’d like the phone number to be tracked.
You have the option of specifying the phone number in Google Ads or manually tracking numbers with website code. If you choose to enter your phone number to Google Ads, you’ll need to enter it exactly as it appears on your website, otherwise, it won’t track your conversion.
Note: Before you add this snippet to your website, make sure you understand how to edit Javascript or have someone who can do this for you!
Place the code from your Google Ads account between the <head></head> tags and below the global site tag. Once you’ve completed this, make sure you save and publish your website, so the changes are reflected.
Back in Google Ads, click “Next” and “Done” to finish the process. You’re all set!
Google Ads Conversion Tracking For Calls From A Mobile Website
If you have a mobile website, and you’d like to track clicks to a phone call, then this is your option. This type of conversion tracking doesn’t actually track the phone call itself, rather it tracks the click on the phone number.
Note: You should feel comfortable updating your own website code or have a developer on hand to help with this.
Create a Conversion Action
Add the Conversion Tag to Your Mobile Site
Once confirming that the global site tag is on every page, install the “event snippet.” From the “event snippet” section in Google Ads, copy the code and add it between the <head> </head> tags and below the global tag, on every page where you’d like to track clicks to a phone call.
Click “Next” and “Done” to finish the process.
Google Ads Conversion Tracking For Apps
- Using mobile app conversion tracking for iOS.
- Using mobile app conversion tracking for Android.
- Using mobile app tracking with Google Firebase.
- Importing your conversions into Google Ads if you use a third-party platform to track your app analytics.
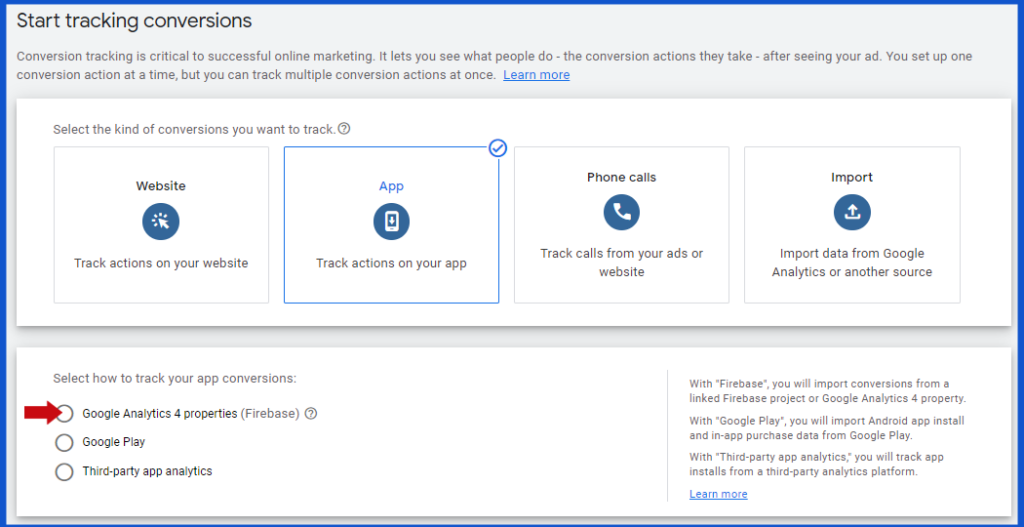
Conversion Tracking for iOS apps
The first step in this process is to link Google Ads and Firebase (Firebase must be installed in your app). You’ll have to have a Firebase project setup, and the Google account you use for Google Ads will need to be the owner of this Firebase project to complete the account linking process.
Link the two accounts by clicking on the wrench at the top right of your Google Ads account and selecting “Linked Accounts.” Find Firebase and click details. Follow the instructions provided in the interface to complete the linking procedure.
Firebase automatically creates events for first open, app download, in-app purchases, and e-commerce events. However, if you’d like to use a custom event, you’ll have to set this up in Firebase. To set up conversion events in Firebase, please refer to the Firebase Help Files.
Once you’ve confirmed Firebase and Google Ads are linked, you can begin importing your conversions.
Import Conversions From Firebase To Google Ads
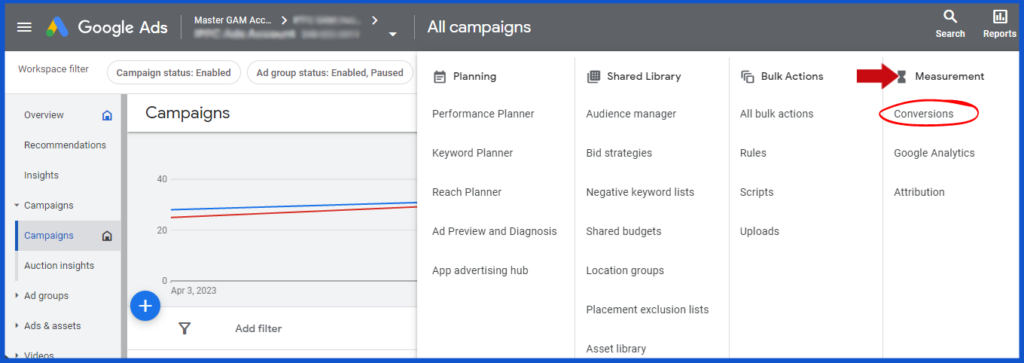
From your Google Ads account, click the wrench in the upper right-hand corner, find the “Measurement” section, and click “Conversions.”
Click on the blue plus icon and choose “App” and then “Firebase.” Then, click “Continue.”
You should be able to see all of the conversions that are available for importing. Select all of the conversion events you’d like to import by checking the boxes. When you’ve finished, click “Import and Continue,” then “Done.” The conversion events you have imported will now be visible in Google Ads.

Firebase And Google Ads Data Match
If you feel that there’s a discrepancy in your data, this could be due to the data you are tracking in Firebase. If you use Firebase to track other networks, then you will see all of the conversion data. However, Google Ads will only show conversions that can be attributed to Google Ads.
Additionally, you may see that you’re recording duplicate conversions. If you think you’re seeing duplicate conversions, then go into the conversion action settings. A warning will appear under “include in conversions.” Uncheck the box next to this option, and save. This should solve duplicate counting issues.
Conversion Tracking for Android Apps
Android app conversions can be tracked using Google Play, using a third-party analytics tool, or adding code to your app.
Make sure that you have both a Google Play developer account and an Google Ads account before beginning this process. You also want to ensure that both accounts are linked together from the linked accounts section of your Google Ads account.
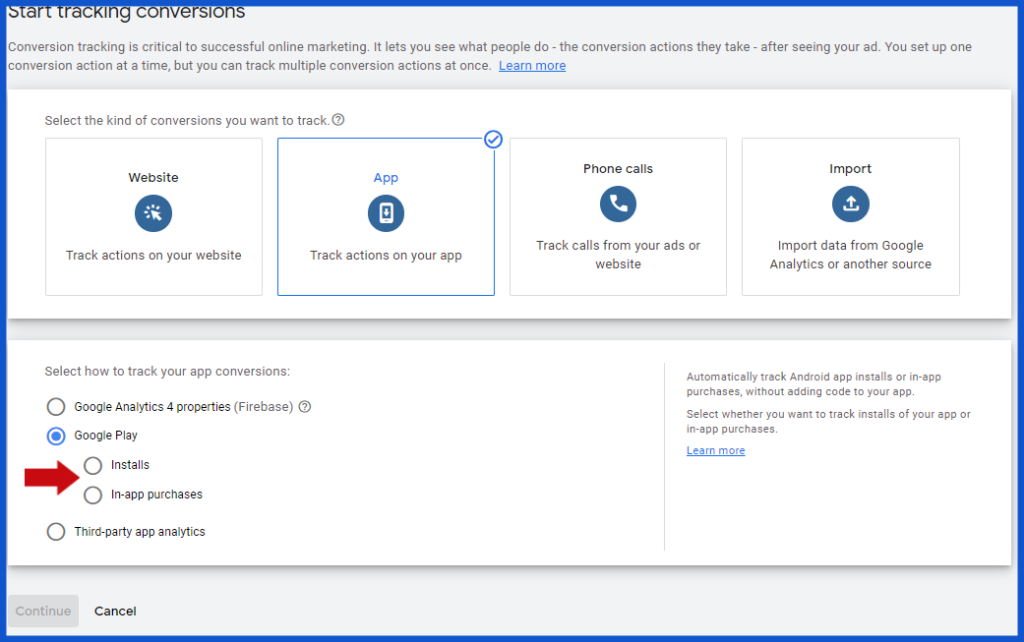
Conversion Action – Installs
In your Google Ads account, visit the conversions setup. You can reach this by clicking the wrench in the upper right-hand corner, finding the heading “Measurement” and clicking “Conversions.” Then, click the plus icon and choose “App” and “Google Play.” Click “Installs” and “Continue.”
In the first section type in the name of the app so that you can find it when reviewing reports. Add a “Value” if there’s a specific value you’d like to assign or use “Don’t assign a value” if you’d prefer not to use one. After you’ve done this, look up the app via the drop-down menu and select the name of the app you want to track.
Just like with the other conversion actions we’ve discussed in this article, you will be required to decide whether or not you want to include this in the conversions column of your Google Ads reporting. You should select this option if you want to use any automated bid strategies.
This completes setup for the Android app installs conversion action, so click “Create and Continue,” then “Done,” to finish.
Conversion Action – In-App Purchases
Sometimes you may want to track more than just app installs – such as purchases made within your app.
If you use in-app billing, then you can track these conversions as well. The value will be imported into Google Ads automatically. The best part is it will automatically track this for you, and you won’t have to add any code to the app. However, only the first purchase and payment will be recorded as a conversion.
To begin the setup of the conversion action, go to the wrench in the top right of your Google Ads account and walk through the steps previously detailed to begin creating a conversion action.
Make sure you choose an action of “App” and “Google Play.” This time, choose “In-app purchases” rather than “Installs.” Give your conversion action a name that you’ll recognize easily in reports, and select an option for “Count.” We recommend using the “Every” option since it’s likely that every single in-app purchase is valuable to you.
For the conversion window, you may want to utilize the full 90 days to help you develop a better idea of a customer’s lifetime value.
Click “Create and Continue” and then “Done” to save your new conversion action.
Note: You can also track conversions in Android apps using Firebase. See the tracking section for iOS apps above. The process will be the same. For more information about Firebase attribution settings, visit Google Ads Help.
Importing Offline Conversions
When agencies and customers set up Google Ads conversion tracking, they often neglect to think about offline conversions that can be imported. These conversions start with a click (or call from your ad) but end up with a prospect visiting your place of business or doing something else in the offline world. They are typically imported from a lead capture software such as Salesforce, HubSpot, custom CRM, or other types of lead capture and tracking.
Offline conversions not only help you to track the success of your campaigns, but they also allow you to utilize fabulous features like automated bidding.
Note: You can also import conversions from Salesforce, but we won’t be addressing that here.
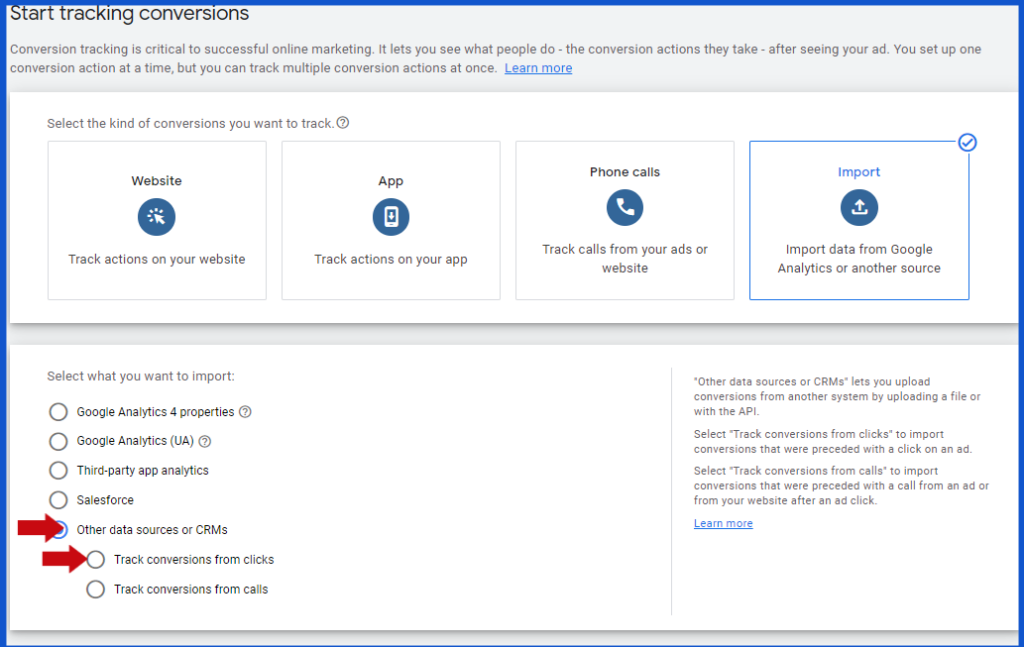
There are two types of imports you can do. You can import information from a “click,” or you can import information from a “call.” The steps for each of these will vary depending on the process you choose.
Importing Conversions From Clicks
One term you will need to understand in order to implement this process is GCLID. GCLID stands for “Google Click Identifier,” and it is a unique ID appended to your URLs that is used by Google to pass information between Google Ads and Analytics.
When you import conversions from clicks, the GCLID is used to match the click and the conversion in your Google Ads account. This means you’ll need to save the unique ID and later be able to match it back to a conversion.
Note: This process is a bit complicated and requires an understanding of HTML, your lead tracking/capture system, and Javascript. If you’re not comfortable messing with any of the above, it might be better to hire someone with experience to set this up!
Create a Conversion Action
Start by checking to see if auto-tagging is enabled in your Google Ads account. If it’s not, then enable it so that Google Ads will generate a unique GCLID for each click.
As with previous forms of conversion tracking, go into the conversions section of your Google Ads account under “Measurement” and click on “Import.” Under “Select what you want to import:” click the radio button for “Other data sources or CRMs.”
At this point, you can name your action and edit all of the settings as we’ve discussed previously. When you’re finished with this, click “Done and Create.”
After setting this up, you won’t be able to upload your conversions right away. You’ll have to wait about 4 to 6 hours. Then, even once you upload the conversions, the data could take up to 2 days to show up in your reports. So be patient!
Add the Relevant Code to Your Website and Setup Lead Tracking Software
Seeing as you’ll be tracking the GCLID, there are a few more steps you need to take that involve updating your website’s code to store this information.
Note: If you are not comfortable updating your website’s code you may want to seek expert help.
The first code snippet you need to add to your website is called a cookie collection code. You need to add this to every page of your site for the tracking to work. You can find a sample code in the Google Ads Help Center.
According to Google, it’s best to put this code just before the end </body> tag at the bottom of the page rather than in the <head></head> tags. If you use a website template for your pages, it’s a good idea to add the code to the template, so you don’t have to add the code every time you make a new page.
The second code snippet you should add to your site is related to your forms, or wherever someone will be adding information. Adding this code allows the GCLID cookie to be read and sent to the lead capture system with the other essential contact information you will use to track conversions.
Google suggests that this code is placed in a hidden field on your form, but cautions that it should be placed AFTER the GCLID cookie collection code so that everything will function properly. For examples of the codes we’ve discussed, visit the Google Ads Help Center.
To complete this part of the setup, go into your lead capture software and allow it to store the information you need. To learn how to do this, you’ll need to review the help files for the lead capture software. Some examples of lead capture software you may be using are Leads Bridge, Hubspot, Infusionsoft, Salesforce, or MailChimp.
Import Your Conversions from a File
Not all document types can be used to store your data. The Google Ads platform accepts Google Sheets, Excel .XLS, or .CSV files. To find the templates in Google Ads, click the wrench in the top right corner, find the heading “Management,” and click on “Conversions.” Then, from the menu on the left, click “Uploads” and then the plus icon. Click on “Templates” and “Conversions from clicks.” Download the appropriate template file.
Use the template file to finish your data setup. You’ll need to enter a time zone ID, which you can find in the Google Ads API Help Files. You also need to enter your GMT offset (or the time +/- you are from Greenwich Mean Time). For example, if you were in New York, then you would enter -0500. Be sure to use four digits or your upload will throw an error.
The other columns needed for the import are “Conversion Name,” “Click ID,” and “Conversion Time.” Optional fields are “Conversion Value” and “Conversion Currency.” Your conversion name should be the same name you entered as your conversion action and have the same capitalization. Again, any discrepancies will cause your import to throw an error so be extra careful.
The date and time are for when the conversion occurred. These will need to be formatted in a specific manner. There are four accepted formats, which can be found in the Google Ads API Help Center under the heading “Date and time formats.”
As a best practice, Google suggests uploading an extra day of information to make sure that all conversions can be attributed appropriately.
You can also upload conversions for multiple accounts from one file. See Google Ads Help for more details.
Upload Conversions to Google Ads
If you are uploading from Google Sheets or from your computer, select “Choose File” and then navigate to your file and upload. However, if you’re using a file transfer method like HTTPS or SFTP, you’ll be asked to enter your username and password.
You can preview your upload by clicking “Preview” to see how many conversions will be imported. And see any errors that occurred by clicking “Details.” If you need to, fix your errors and begin again, or you can choose to ignore the errors.
When you’re ready, click “Apply File,” and wait until the progress bar shows that the upload is complete. If you click “Details” after the upload completes, you will see all of the imported conversions.
If you don’t see your conversions in the conversions column right after you upload them, don’t panic. It takes about 3 hours for this information to be populated, and it won’t be ready to use right away.
Wrapping Up
Once you have a little time and practice under your belt, you’ll be a pro at this. Plus, Google Ads gives you many helpful hints and prompts to guide you along the way.
Good luck!