A Step-by-Step Guide to Set Up Google Ads Conversion Tracking in Shopify

Discover how to implement Google Ads conversion tracking within Shopify with this step-by-step guide. From creating a conversion action to placing the correct code, we'll walk you through the process to optimize your advertising efforts.
If you’re running Google Ads and managing a Shopify store, you might be wondering how to bridge the two platforms effectively.
How can you track and understand the impact of your Google Ads on customer actions within Shopify?
That’s where Google Ads Conversion Tracking comes into play. It provides insights into your campaign’s performance, but setting it up in Shopify can seem complicated. Fear not, we’ve got you covered with this step-by-step guide.

What is Google Ads Conversion Tracking

Alright, here’s the scoop on Google Ads Conversion Tracking – consider it your super-secret spy for your ad campaign!
This free tool is like having an inside track on what customers do after they click on your ads. Do they buy something? Sign up for your newsletter? Download your app? Well, Google Ads Conversion Tracking is here to spill the beans!
Every time someone completes an action that you care about (that’s what we call a “conversion”), you get the lowdown. It’s like getting a virtual high-five for every sale, signup, or download. Keeping tabs on these conversions helps you figure out which ads and keywords are performing best, so you know where to focus your efforts.
And the best part? It works across Google Search, Display, YouTube video ads, Shopping ads, and even when someone clicks on a phone number on your mobile site.

Google Ads Conversion Tracking in Shopify

Roll out the red carpet to this dynamic duo as makes everything easy-peasy. So, whether a customer makes a purchase, signs up for your mailing list, or downloads your app, you’ll be in the know.
It’s like having a magnifying glass on your customers’ actions, giving you invaluable insights to make your ads more effective.
With a few easy steps, you can start maximizing your ad campaign’s performance in no time. Let’s unlock this superpower, shall we?

Steps to track Google Ads Conversion in Shopify

Step 1: Make a Conversion Action in Google Ads

1. Open Google Ads, and click on ‘Tools & Settings’, then ‘Conversions’.

2. Click on “+ New Conversion Action.”

3. Choose “Website Conversion” from four choices.

4. Choose the category that suits the conversion you want to track, for example, ‘purchase’.

Step 2: Set Up the Tag

1. Once you create a conversion, you can see 3 options, Select Install tag yourself from that.

2. Copy the code from the Google Tag.

3. Now go to your Shopify store and click ‘Themes’ under ‘online store’.


4. Click on the ‘Actions’ from the published themes. In that select the “Edit code”

5. Find the theme.liqquid file, scroll to the end head tag “< /head >” and place the copied code from the Google Ads (Google Tag) above the < /head > tag.

6. Click ‘Save’.

Step 3: Final Steps

1. Click ‘Settings’, then ‘Check out’ tab.

2. In the check out tab, Scroll to the bottom to find ‘Additional scripts’.

3. In the “Additional Script”, paste your Global site tag or Google tag, which you have copied earlier from the Google ads

4. Return to Google Ads and copy the code from ‘Event Snippet’. This code will be triggered on the order confirmation page.This should be pasted in the ‘Additional scripts’ on Shopify. It helps track purchases.

5. If you want to see the purchase value, replace ‘value’: 1.0 with “value’: {{ checkout.total_price | money_without_currency }} and ‘transaction_id’ with ‘transaction_id’: ‘{{order.order_number }}’.

6. Click ‘Save’, go back to Google Ads account, click ‘Next’, and you’ll see a congratulations message! And you are done! 🎉

Conclusion

The key to successful digital marketing is understanding and optimizing how your ads drive customer actions. Setting up Google Ads Conversion Tracking in Shopify enables you to track how your customers interact with your ads and make necessary changes to improve performance.
Remember, these steps are a guide, and actual steps may vary slightly based on your specific website setup or updates to the Shopify or Google Ads platforms.
Happy tracking!

Step 1: Create a Conversion Action in Google Ads

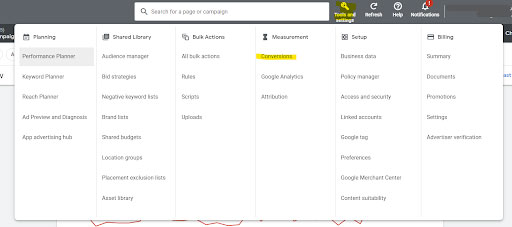
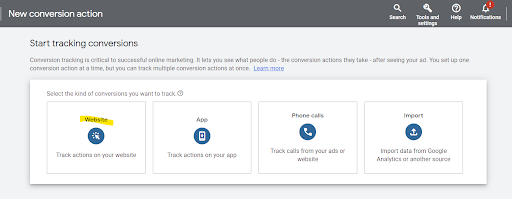
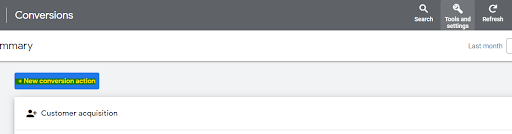
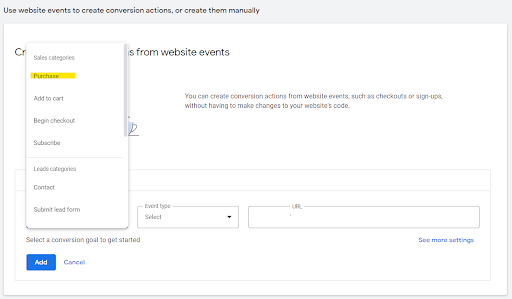
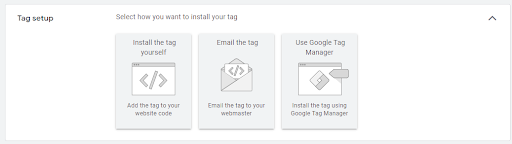
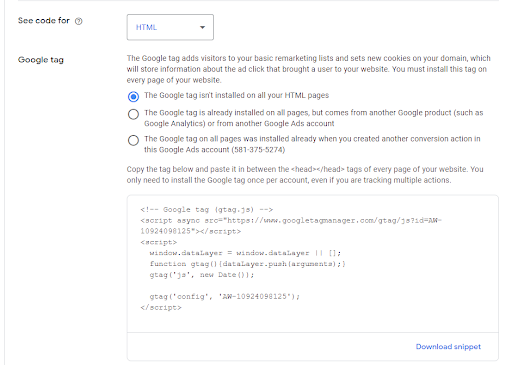
Creating a conversion action in your Google Ads account is the first step. Here’s how:
  • Go to ‘Tools & Settings’ tab in Google Ads, click on ‘Conversions’.
  • Click on + New Conversion Action
  • Select “Website Conversion” among the four options
  • Choose the category that suits the conversion you want to track, for example, ‘purchase’.

Step 2

  • Once you create a conversion, you will be able to see 3 options. Select Install tag yourself from that.
  • Copy the code from the Google Tag:
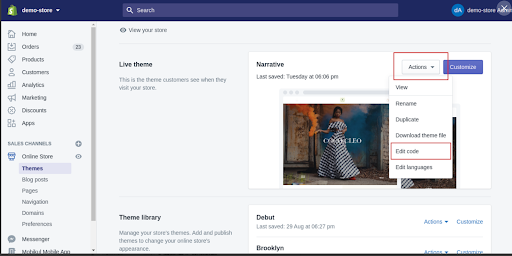
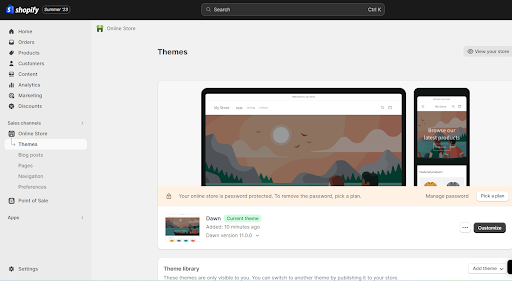
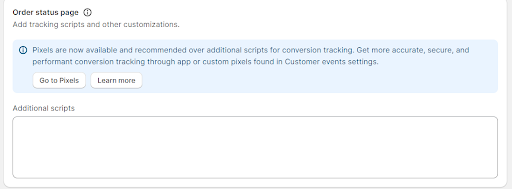
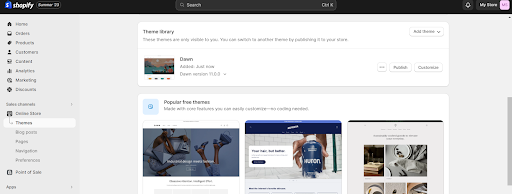
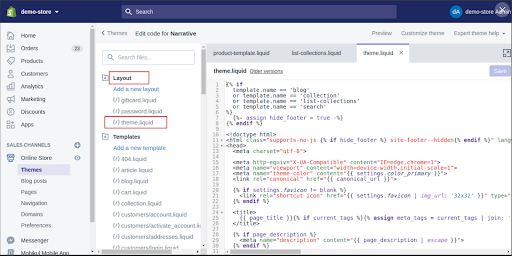
Now go to your shopify store and click on Themes under online store
  • Click on the actions from the published themes. In that select the “Edit code”
  • Select the theme.liqquid and scroll down to the end head tag “ < /head > and place the copied code from the Google Ads (Google Tag) above the < /head > tag

Step 3

  • Now click on the setting and Go to Check out tab.
  • In the check out tabe, scrol down to the end an you will be able to see the “Additional scripts”
  • In the “Additional Script”, paste your Global site tag or Google tag which you have copied from the Google ads.
  • Now go back to your Google Ads account and copy the code from the “Event Snippet” . This code will be triggered on the order confirmation page. And paste this code in the Additional scripts of your shopify account. This will help in understanding the number of purchases.
  • If you want the value of the purchases to be dynamic, replace the ‘value’ : 1.0 with this “ value’: {{ checkout.total_price | money_without_currency }} and ‘transaction_id ’ : with ‘transaction_id’: ‘{{ order.order_number }}’
  • Now click on the “save button” and Go back to the Google Ads account and Click on Next and there you should be able to see the congratulations message.

Leave a Comment

Leave a Comment

IPPC Team
IPPC Team
At IPPC it is our aim to spread the word and educate ambitious agency owners on the benefits of white label PPC and agency growth. We care about creating quality content that delivers value for our followers, friends and partners.